
How to Use a Spinning Bike
How to Use a Spinning Bike
We are privately owned and not affiliated with the government in any way or form.

Introduction
Ready to take on one of the hottest trends in recent fitness history? Spinning bikes provide a fun but challenging cardiovascular workout. Sure, maybe you’ve seen the spinning bikes all over your local gym or heard your friend talking about that spin class she takes on Saturday morning.
What’s the hype all about? This comprehensive manual will guide you through everything you need to know about spinning bikes, including what exactly they are, how and why to use one, as well as a few sample workouts for beginners, weight loss and building endurance. As they say in class, time to saddle up!
What is a spinning bike?
If you’ve stepped foot in any commercial gym recently, you may have noticed a spin class or two on their weekly calendar. This high-intensity cycling workout has brought the cool factor to exercise bikes with its upbeat music and empowering instructor-led sessions.
Before it was known as spinning, it was called indoor cycling. The sport was first made popular in the very early 1990s by John Baudhuin, cyclist and entrepreneur, and Johnny Goldberg, a long distance cyclist from South Africa. The two men took the standard indoor stationary bike and transformed it with technology for a first-of-its-kind high-powered cycling experience.
The sport is practiced in 80 countries around the world. In fact, spinning is so popular that it’s inspired a slew of stand-alone exercise bike and cycling studios across the country such as CycleBar, FlyWheel and SoulCycle. According to the Association of Fitness Studios, indoor cycling companies generate 55 percent more revenue than other types of fitness studios.
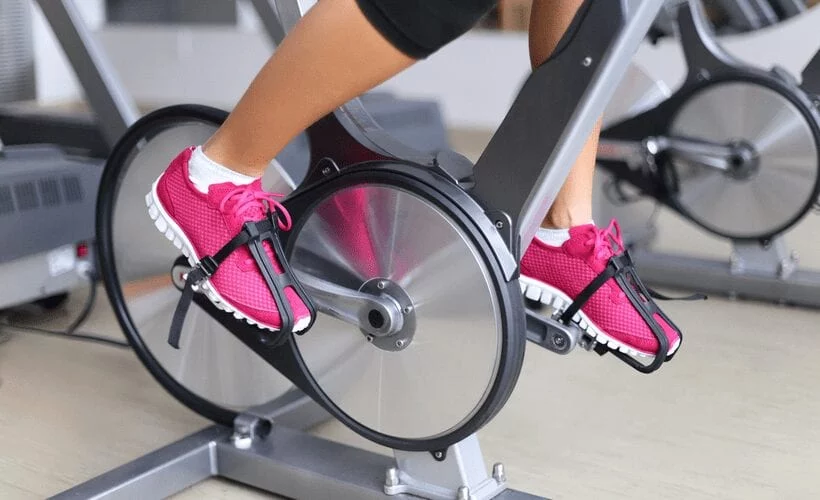
Spinning bikes are different from the traditional exercise bike because they were designed for fast-paced pedaling, including standing and climbing during a spin workout. Also, unlike an exercise bike, spinning bikes have a large flywheel at the front to help keep the bike weighed down. On average, flywheels weight about 38 pounds. The pedals on a spinning bike are directly connected to the flywheel to help provide resistance and build momentum. You won’t be able to coast like you can on a regular exercise bike!
Reasons for Using a Spinning Bike
Spinning bikes increase your muscular endurance, strength and stamina. The bike targets lower body muscles, including quads, glutes, calves and more. Bonus: it also helps to work your core! Hello, ab muscles! It’s a tough workout but if you’re up for the challenge, the benefits really do add up. Studies show that users burn anywhere between 400-600 calories during 40-60 minutes of spinning. Suffice it to say that spinning is also good for shedding a few extra pounds!

As with any aerobic workout, there are numerous benefits to your overall heart health, including lowered risk of heart disease, lower cholesterol and blood pressure. Spinning also helps build up your lung capacity, which increases your overall oxygen intake. Your muscles will thank you later for that one — especially when they are extra tired after a spinning bike workout!
If you’re recovering from a knee, hip or other orthopedic injury but still want to keep up with your fitness, spinning bikes may be a viable option for you. The bikes offer a low-impact workout without all of the added stress to joints. Consult with your doctor before starting any new fitness regimen.
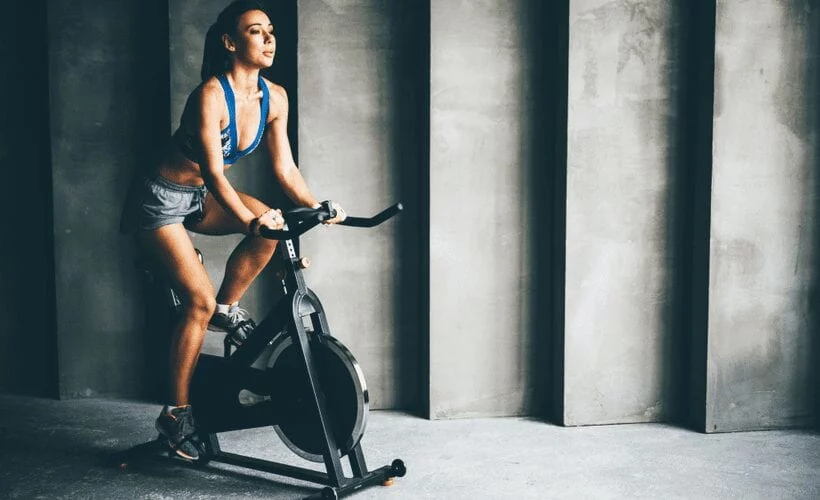
How to Use a Spinning Bike
A spinning bike is different from an exercise bike, so before you go on your first ride, it’s important to get acquainted with how to properly use it. This will help you avoid causing injury or strain to your body.
There are three different hand positions that are commonly used in spin. The handlebars are there to help you support yourself and should not be looked at as a crutch during your workout! Your spin teacher or workout plan will use the following lingo when referring to where to put your hands:
- Position 1: Wrap your hands around the middle part of the handles. Generally, this position will be used when warming up, cooling down and after intervals.
- Position 2: Place your hands on the curved bottom part of the handles. This position is the most common and is where you’ll leave your hands for the majority of your class or personal workout.
- Position 3: Wrap your hands around the very tops of the handlebars. This position should really only be used when you are standing and climbing.

Next, there are several different body positions to know before you spin. Before we cover the positions, you should always increase the resistance when you go from a sitting to a standing position to avoid injury. Typically, spinning bikes have a manual knob or an electric display to adjust the resistance. Here are the different positions to know:
- Seated Flat and Seated Climb: In this seated position, relax your shoulders and keep your chest up as you pedal. Don’t constrain your upper body! You want to stay nice and loose. This position works best with hand positions one and two, depending on your height.
- Standing Flat: This position is when you transition from sitting in the saddle (that’s spin talk for seat!) to standing while you pedal. Best if used with hands in position one or two. Either or is fine, depending on your personal preference.
- Standing Climb: In this position, you’ll substantially increase the resistance and therefore need to shift your weight back. This helps to maximize your muscle use. Use hand position three for this pose.
Before you get started, sit on your bike and make any necessary adjustments to the seat, handlebars and pedals so that it fits your body. The seat should be level with your thighs when held at a 90-degree angle. The handlebars should be slightly higher than your seat. The pedals should be a comfortable distance so that there’s a slight bend in your knee. The toe clips and straps should fit securely around your shoes. Ask your instructor or gym employee if you have any questions.
During the workout, keep your core tight. This gives you control over your movements so that you aren’t bouncing around everywhere.
Pros and Cons of Using a Spinning Bike
Not to be confused with a stationary bike, a spinning bike is specifically designed for high-intensity workouts that mimic outdoor terrain. There are advantages and disadvantages to using a spinning bike. Here are the pros and cons:
PROS
- Oftentimes, it’s easy to feel bored at the gym. If you’re taking a spin class, you’re going to feel motivated thanks to the upbeat music, the comradery of your classmates and the inspirational pep talks from the instructor. Spinning is a great way to get a high-calorie workout and stay motivated to reach your fitness goals.
- Like any cardio workout, spinning is also good for your heart health because it lowers your blood pressure and cholesterol. Because it’s high-intensity cardio, it also helps to burn fat and increase your lung capacity.
- Since spinning bikes are designed for indoor use, you can get your workout in during the bitter cold winter months and the blazing hot summer months. No need to halt your workout because of the weather!
CONS
- If you’re very short or very tall, a spinning bike might not work for you due to the limited adjustment range. While the bike is designed to accommodate most body sizes, there are some exceptions. Check your bike before you get started to see how you stack up.
- Spinning bike seats are very firm and can cause discomfort to new users. If you’re still uncomfortable after a few classes, buy a pair of padded bike shorts for more support.
- While spinning is a great workout for your heart and lower body, it lacks any sort of movement to benefit your upper body, such as arms and shoulders.
Sample Spinning Bike Workout for Beginners

Spinning bikes are a versatile exercise tool that just about anyone, no matter your age or fitness level, can enjoy. Since you’re just starting out, don’t push yourself too hard. You don’t want to overdo it at the beginning. Do yourself a favor and stretch before you begin. Avoid loose-fitting clothing and wear a pair of supportive sneakers. Oh, and bring a small towel because you’ll be dripping with sweat.
Be sure to talk to your doctor and go over any concerns before you begin. Now, grab your water and saddle up!
Minutes Instructions
| Minutes | Instructions |
|---|---|
| 0:00-5:00 | Stay seated during your warm-up with hands in position 1 or 2. Your target RPM is 100. To begin, set the resistance to light and slowly increase to a moderate resistance over the next five minutes. |
| 5:00-10:00 | Time to get out of the saddle! Transition to a standing flat. Leave the resistance set to moderate. Target RPM: 70. Leave your hands in position 1 or 2 for now. |
| 10:00-12:00 | Dial the resistance back to light. Target RPM: 110. Remain out of the saddle. |
| 12:00-15:00 | Leave the resistance where it is and sit back in the saddle. Increase your RPM to 120. Remember to stay hydrated! |
| 15:00-17:00 | Stay standing! Up the resistance to moderate. RPM: 80. |
| 17:00-19:00 | Leave the resistance on moderate and remain out of the saddle. Double your pace and work to maintain an average RPM of 120. (If you’re feeling tired, you’ll be able to take a seat soon!) |
| 19:00-21:00 | Transition from a standing flat to a seated flat. Slow your pace down by half. Target RPM: 80. Keep the resistance set to moderate. Remember to check your form! |
| 21:00-22:00 | Transition to a standing flat with hands in position 1 or 2. Resistance stays on moderate. Increase your pace so you’re pedaling twice as fast as you just were. Target RPM: 120. |
| 22:00-25:00 | Decrease the resistance from moderate to light and assume the seated flat position with hands in position 1 or 2 for the next three minutes. RPM: 100. The next set will be the most challenge yet. |
| 25:00-30:00 | Crank up that resistance to heavy. Rise out of the saddle and transition to a standing climb using hand position 3. Remember, when you’re in the standing climb position, move your body weight as you pedal downward. RPM: 70. You’ve got this! |
| 30:00-35:00 | Transition to a seated flat and move your hands to position 1 or 2. Decrease the resistance down to light or moderate. RPM: 80. |
| 35:00-40:00 | Transition out of the saddle to a standing flat with your hands in positions 1 or 2. Slowly increase the resistance from light to moderate over the next five minutes. RPM: 100. |
| 40:00-45:00 | Transition to a seated flat and begin your cooldown. The resistance should be set to light. RPM: 80-100. |
| Post-workout tips: | Nicely done. You’ve completed your first spinning bike workout. Even though you drank plenty of H20 throughout your workout, you’ll want to keep that up after. Stretch your muscles and replenish your energy with a protein-rich snack. |
Sample Spinning Bike Workout for Weight Loss
Spinning bikes can be a quick way to lose weight. If you’re eating a healthy and well-balanced diet, coupled with spinning several days a week, you’re likely to see the number on the scale begin to drop. Of course, before starting any new diet or fitness plan you’ll want to discuss it with your primary care doctor. Below is a sample workout for those who want to use spinning bikes as a way to shed the pounds. Everyone is different, so it’s important to remember that this plan can be modified depending on your health, fitness level and exercise goals.
Minutes Instructions
| Minutes | Instructions |
|---|---|
| 0:00-5:00 | Warm up in the seated flat position, your hands in position 1 or 2. |
| 4:00-8:00 | Now that you’ve got your heart rate up, increase the resistance and maintain a moderate speed of 70-80 RPM. For the next four minutes, alternate every 60 seconds between sitting and standing while maintaining an RPE between five and six at moderate resistance. |
| 8:00-11:00 | Nice work! Decrease the resistance. Sit down with your hands in second position, just as you started. Keep your RPE at 5 and change the resistance to light. |
| 11:00-12:00 | With your hands remaining in second position, stand up and jog for 60 seconds at a fast speed (80-100 RPM). RPE: 5-6. Resistance: light. |
| 12:00-14:00 | Keep those hands where they are! Over the next two minutes, crank up the resistance every 30 seconds and pedal at a slow to moderate speed (50-70 RPM). Resistance: moderate to heavy. RPE: 6-7. |
| 14:00-17:00 | You’re halfway there! For the next three minutes, stand up and pedal with your hands in third position (place them at the top of the handlebars). Change the resistance to heavy and put the speed at a low to moderate pace (40-50 RPM). Feel the resistance — and burn! RPE: 7-9. |
| 17:00-26:00 | Time to do it again! Repeat minutes 8:00-17:00. |
| 26:00-28:00 | Stand up and place your hands in second position as you jog at a very fast speed (100-125 RPM). Resistance: light. RPE: 8. |
| 28:00-30:00 | Time to cool down — and sit! Leave your hands in second position and finish off with a moderate speed (80 RPM). Resistance: light. RPE: 3-4. You did it! |
| Post-workout tips: | After a sweaty workout like this one, it’s time to hydrate! You should also stretch your muscles. This will improve your flexibility and help ward off any aches and pains. Grab a banana or other healthy snack to fuel your body! |
Sample Spinning Bike Workout for Building Endurance

Cardio is a great way to build endurance and stamina. This can easily be achieved by pacing yourself on a spinning bike. Don’t overwork yourself at the start or you’ll risk a possible setback like an injury. As you build your endurance over time, take this sample spinning bike workout plan and modify it. You can increase the time and resistance as your body becomes accustomed to the workout. Don’t forget your water bottle and towel! Talk to your doctor before starting any exercise plan.
Minutes Instructions
| Minutes | Instructions |
|---|---|
| 0:00-10:00 | Warm up in the seated flat position with your hands in position 1 or 2. Start with a light resistance and steadily increase it to a moderate resistance during the warm up. |
| 10:00-15:00 | Transition from a seated flat to a standing flat and leave your hands in the same position. Leave the resistance set to moderate and pedal at a jogging pace for the next five minutes. |
| 15:00-16:00 | Transition back to a seated flat and decrease the resistance to moderate-light. Take a minute to recover and drink water. Keep your heart rate up. |
| 16:00-17:00 | Transition to a standing flat with your hands remaining in positions 1 or 2. Increase the resistance to moderately heavy. You should be pedaling faster than a jog but not quite at a full-speed run. |
| 17:00-23:00 | OK, now’s the time to crank up that resistance to heavy. Transition to a standing climb and move your hands to position 3. Regulate your breathing. Keep your pace fast but steady. |
| 23:00-24:00 | Come back to a standing flat and move your hands back to position 1 or 2. Decrease the resistance to moderate. Take a drink of water. |
| 24:00-30:00 | Back to a standing climb (remember, hands in position 3) for one last round of heavy resistance! |
| 30:00-35:00 | Transition to a seated flat and adjust the resistance to moderate. Hands in position 1 or 2. |
| 35:00-40:00 | Begin the cool down. Stay in the seated flat position and adjust the resistance to light. |
| Post-workout tips: | Repeating this workout several times a week will help you build your overall endurance. The more you practice, the longer you will be able to go! Take a day off and let your body recover. Use a foam roller to work out any kinks and ice muscles if you feel any aches or pains. |


